Home » Training » Training Videos » Suspension » Measure and Adjust Ride Height
Measuring and Adjusting Trailer Ride Height
In this video, Aaron from North Central Utility (formerly Badger Utility) demonstrates how to measure and adjust the ride height on a trailer with a Hendrickson Air Ride Suspension.
Training Video
- Title: How to Adjust Ride Height on a Hendrickson Air Ride Suspension
- Source: North Central Utility
- Run Time: 3:02
Determining Designed Ride Height
The designed ride height is listed on the suspension identification tag. The location of the identification tag varies by suspension model.
Measuring Trailer Ride Height
Preparation
- Place the trailer on a flat, level surface.
- Chock the trailer wheels and release the trailer parking brakes.
- Check the air pressure in the trailer tires.
- The tires must be at the manufacturer’s recommended pressure when checking trailer ride height. If necessary, inflate or deflate the tires to match this recommended pressure.
- Maintain air pressure in the trailer air-ride suspension system.
- Trailer ride height can be checked with the trailer coupled to or uncoupled from the tractor. If the trailer is uncoupled from the tractor, maintain pressure in the trailer air ride suspension system by applying shop air to the trailer emergency glad hand. This ensures that the trailer parking brakes remain released.
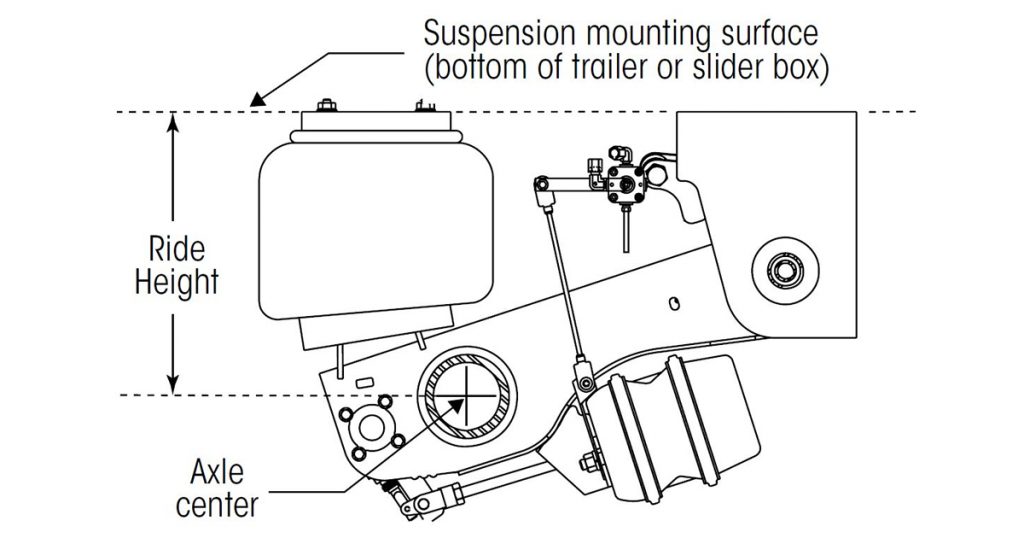
Measuring Ride Height
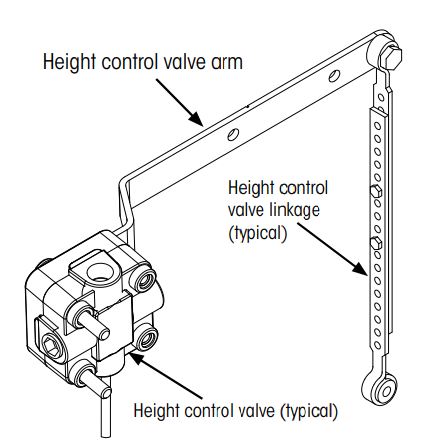
Suspension ride height should always be measured on the axle with the height control valve. There are two easy ways to measure suspension ride height:
- Using a Hendrickson Ride Height Gauge
- Measure the distance between the axle and the mounting surface of the suspension. Ride height gauges work with both 5-inch and LDA™ Large Diameter Axles. Ensure the proper scale on the ride height gauge is being used.
- Using a Tape Measure
- Measure the distance from the top of the axle to the mounting surface of the suspension.
- Add half of the axle diameter to this measurement to determine the suspension’s ride height.
Adjusting Suspension Ride Height
- Disconnect the height control valve linkage at the lower bracket.
- Push the height control valve arm up to raise the ride height (add air to the air springs) or down to lower the ride height (remove air from the air springs) until the distance between the suspension mounting surface and the center of the axle equals the designed ride height.
- NOTE: Ensure reservoir pressure is at a minimum of 90 psi. This ensures adequate pressure to open the pressure protection valve (PPV).
- NOTE: A delay of 5 to 10 seconds may occur before the height control valve allows air flow to or from the air springs.
- With the suspension at the proper ride height, lock the control arm in the neutral position by inserting the wooden centering pin through the control arm and into the hole in the valve body.
- Reconnect the height control valve linkage to the lower bracket. If necessary, adjust the linkage length so the control arm is held in the neutral position when the suspension is at the designed ride height.
- Remove the wooden centering pin.